Wooden Quilt Blocks AKA "Barn Quilts"
I am a born and raised Nebraskan--a state where you are never more than a 15-20 minute drive from a barn or a field of corn. I grew up in a small town half-way between Omaha and Lincoln and my sister married a farmer who works sun up until way past sun down during the spring planting season and the fall harvest.
I currently live in Omaha where I can see a field and a Target store from my window. I first saw barn quilts about 12 years ago when a local FBLA group created 12' x 12' designs for area farms as a fundraiser. I have always wanted to create a scaled down version that would fit in a garden or front porch.
As it turns out, I have made several in the last year and have one displayed in my garden (see at right), another for a neighbor's porch and a couple of small ones that I hang seasonally above the cabinets in my kitchen. You will find excellent web sites that share patterns, examples and tips and tricks. Here is a starter post from the DIY network.
Materials I Gathered Before Starting:
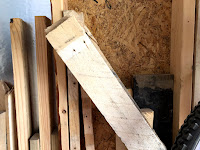
- Boards: I usually use old pallet boards or old fence boards but many people use plywood (the outdoor variety) or other scrap wood that they have laying around. I also use a backing board to attach the boards a little more securely. I use lathe boards or surveying stakes as trim boards for my projects.
- Saw: You will want to cut boards to the proper size as a first step. (mine are 16" in the sample photos)
- Wood Putty: When I use scrap boards I like to use a little wood putty to fill in nail holes or gaps between boards. (Ace Hardware $3.99)
- Sand Block: Wood texture and the roughness of the wood adds character but you want the wood smooth enough to paint. I hit it with a wood block a couple of times to even out the surface.
- Wood Glue: Used to glue the boards together and also to a backing board if using pallet or fencing boards. Not needed if using plywood.
- Screws & Drill: Used to attach the boards to the backing board--not needed if using plywood.
- Painters Tape: Clean edge blue painters tape works best--you will use more tape than you think!
- Scissors: Used to cut the tape with even edges.
- Paint: In the example I use acrylic paint and then add a spray poly coat. If you know the quilt will be displayed outside you will want to use outdoor paint.
- Hair Dryer: Not necessary, but it will speed up drying time if you want to finish in one setting.
- Pencil, Ruler, Yardstick, Tape Measure: Have these items ready for laying down your pattern and getting your measurements precise.
- Clear coat: I like to spray my completed project with clear coat to apply a layer of protection. A couple of coats is recommended if you are displaying the project on a porch or where it will be exposed to the elements.
 |
| Select your boards and make a plan |
Step #1: Gather your materials and begin by cutting the boards you will use for your project. I usually measure the width of my boards and then decide how many boards I will be using. In my example project my boards were approximately 4" wide so I decided to use four boards and go with a 16" x 16" barn quilt. If my boards were 3" wide I would have gone with 4 boards and cut the boards to 12" so that I had a quilt 12" x 12". Bottom line--you want a square and to limit your time cutting boards :) You can also use a solid board (preferred by many) but for me that would require a purchase and if you have read many of my posts you will know that I like to make use of scrap wood when possible.
 |
| sand your boards |
Step #2: Once your boards are cut, use your sanding block to knock down any rough edges along the sides of the boards and any rough patches on your boards. Don't spend a lot of time sanding--just eliminate edges that may give you slivers or make the boards hard to paint.
Step #3: You won't need this step if using plywood. Connect your boards by gluing them together with wood glue and using wood screws to attach them to a backing board(s) of your choosing. I often use two scrap pallet boards on the back to secure the boards together and to use for hanging wire/hardware.
Step #4: Again, you won't need this step if using plywood. I like to use wood putty for any cracks or nail holes in the boards. Dab a bit in the cracks, allow to dry and then sand lightly for a more even painting surface.
 |
| sketch your design |
Step #6: Now for the fun part--transferring your selected pattern to your board. I like to sketch my design out on paper before drawing it onto the wood. Study the geometry of your design first. Most quilt patterns are geometric, with 2, 3, 4, 5, 6, 7 or 8 squares on a side. Divide your design into the proper blocking pattern and then look at it as rows and columns transferring the design one block at a time. Pencil in the design using very light lines on the front of the barn quilt to avoid problems with lines showing through the paint. Make sure you keep your design square and check your finished design with your paper sketch.
 |
| prime your board & tape |
Step #7: Tape, paint, wait... repeat Tape over the edges of your design. I use precise edge painter's tape but you can use other kinds of painter's tape as long as it lifts easily and gives your a good edge. Press the edge of tape down and run your fingernail along the edges. One of the video's I watched gave me the tip of painting along the edge of the tape with the background color to seal the tape before painting in your darker color which eliminates bleeding. Proceed by painting in your next darkest color.

Step #8: Let each color dry: Use your hair dryer to dry each coat of paint so that you can easily remove the tape, retape and paint in your next color within a few minutes rather than waiting 45-50 minutes between colors. If you have every heard the phrase, "it is like watching paint dry....." the hair dryer makes this a speedy step.
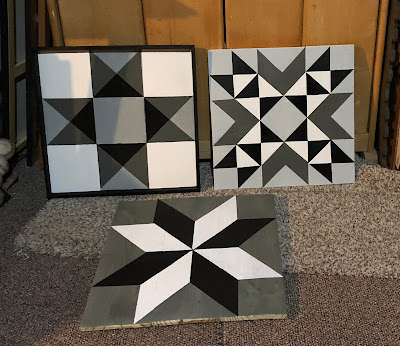
Step #9: (Optional) Use lathe boards or other 1" + boards to frame up the edges of your project. I usually paint mine black before assembly and glue and nail the boards for a good finished/sturdy look. If you look at the finished blocks below, the one on the far left is framed, the other two have yet to be framed.


Comments
Post a Comment