Wood Slat Wall Art from Wood Strips & Scraps
"Hey mom, I have a project idea for you."
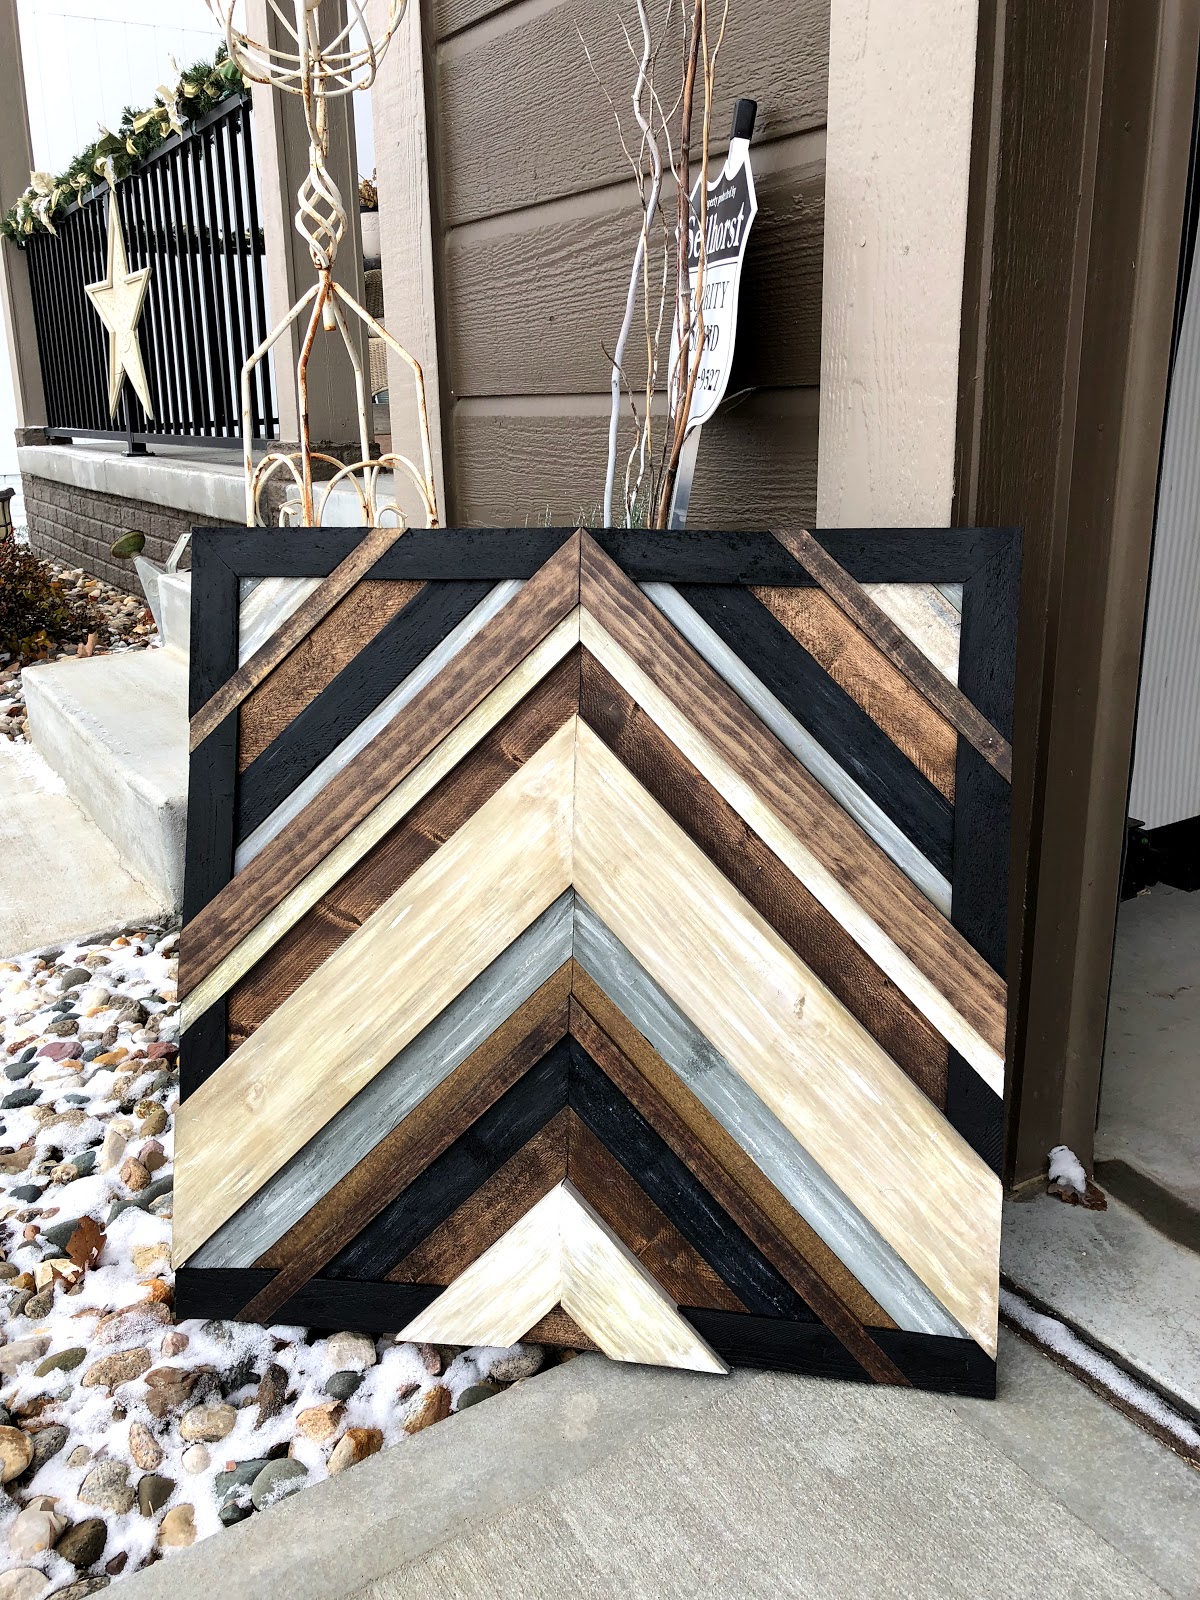
How can you resist a craft idea from one of your grown children? My kids always seem to know that I'm up for a project and retirement has afforded me the time to dig in and take on a variety of project ideas. The idea my daughter shared was a wall art project made from scraps of wood painted various colors that are cut, glued and nailed to a backing. After looking at her ideas, I went to YouTube and Pinterest to gather ideas and get a few tips and tricks on how to get started.
YouTube Videos I found helpful:
Step #4: Starting in the middle/center of your project, use Gorilla wood glue to begin attaching your wood strips to your backing. Make sure to follow the guide lines of your pattern to keep everything square and aligned. I like to glue and nail as I go so that I have a firm board to nail against. Some of the DIY videos I watched recommended that you can glue everything (with securing clamps) then use finish nails/brads to secure boards if you want a "little give" in the pattern alignment.
How can you resist a craft idea from one of your grown children? My kids always seem to know that I'm up for a project and retirement has afforded me the time to dig in and take on a variety of project ideas. The idea my daughter shared was a wall art project made from scraps of wood painted various colors that are cut, glued and nailed to a backing. After looking at her ideas, I went to YouTube and Pinterest to gather ideas and get a few tips and tricks on how to get started.
YouTube Videos I found helpful:
- DIY Video
- Another DIY Video (wish I had some of the saws & power tools in this video)
- Time Lapse Video of project creation
Materials I Gathered Before Starting:
- Bundle of wooden laths from Menards (just under $15 for a bundle of 50+ or $.39 each--I used less than 10)
- Scrap backing wood--one of the tips I learned from the YouTube Video is that particle board and plywood are heavy so I went with a masonite board from Menards which comes in a variety of sizes and can be cut down at the store for your project. Pegboard would also work and would make it easy to string a wire to hang the project. (mine was under $5 and I'll cut it down for 2-3 projects)
- Saw--we have an electric miter saw which made the 45º angles a piece of cake but a jigsaw or handsaw and miter box would also work.

- Craft Paint & Stain--I used craft paint (black, white, & dove gray) that I had on hand and MinWax Stain (Special Walnut $4.96 @ Walmart)
- Paint Brushes: Chippy paint brush (for paint) and foam brush and rubber gloves (for stain)
- Gorilla Wood Glue (some DIY videos I watched used liquid nails in a caulking gun)
- Finish Nails (use a size that is the correct depth for your boards) or a nail gun and brads
- Sand paper or sanding sponge

Getting Started:
Step #1: Using your backing board, a ruler/yardstick/tape measure and wooden slats draw your
 design on the backing using a pencil. Take care in marking your angles (I like to use 45º angles to keep things even).

Step #2: Once your pattern is drawn on your backing board, the fun begins! Begin laying your lath boards (or the boards you are using) on your design and mark them for cuts. I did not go with precision/exact cuts but rather eyeballed them to get close to the correct size and made my angled (45º) cuts and put them on the pattern. (After all boards are cut, painted, glued and nailed down you will cut the outer edges even along your backing board) Continue cutting boards until you have a board for every strip of you pattern.


Step #3: Rough sand the slats to knock off any slivers of wood. Paint and stain your boards the desired colors. I like to paint the top & sides of the boards so that cracks do not reveal an unpainted board. Depending on the look you are going for you may want to sand the boards after the paint dries to give the boards a more weathered look. On my project I sanded the boards but also added a dry brush smudge of white/grey paint to the boards to make them look a little more weathered. I double loaded my brush in white
paint and walnut stain for a few of the white boards to make them look a bit older.
 |
| Double loaded brush using stain & white paint |
 |
| Project painted, stained, smudged with white paint |
 |
| Glue the boards to the backing. |
Step #5: After the boards are glued and nailed to the backing, the next step is to cut around the perimeter of the project with a jigsaw (wish I had a table saw or circular saw for this step!)
Step #6: Use extra lath slats (I painted mine black) nailed around your project for a frame. I haven't decided if I like the project better displayed horizontally or vertically--write a comment and help me decide.


Updated 12-8-2018: Here are a few other projects I recently completed--I am obsessed with creating Wood Art Mosaics!


Comments
Post a Comment